Saturday, November 28, 2015

Chord Basics - Cowboy Chords

There is a certain beauty in the simplicity of a cowboy chord which offers the guitarist either a lifetime of simple songs to strum or a gateway into a larger musical world. If you have never heard of cowboy chord it is a term (at times derogatory) which refers to open chords and their simplicity which bring about the image of a cowboy playing guitar around the campfire. 

The mastery of open chords will help the budding guitarist develop a sense of confidence and security in their playing – teachers however, should be weary that students may become complacent in this security and must help students push ahead to develop new skills. 

Below are fifteen of the most commonly used cowboy/open chords – this list is by no means meant to be exhaustive. In the coming months I’ll be talking about how to help students use these chords to develop their skills.


Saturday, October 31, 2015

The Basics of Relaxation

     Have you ever seen a guitarist play and think “they make it look so effortless” or “that looks painful” – the truth is you’re probably right on both accounts! One of the keys to effortless playing is having as little tension as possible - which means recognizing when it occurs and being able to relax or adjust the specific area of our bodies which is causing the issue. 

Reducing tension in the body as we play is one of the most difficult things to teach a student because: 1) we cannot be inside another’s body to demonstrate relaxation or feel where the tension is occurring and 2) we may play with tension ourselves but have become accustomed to it over the years and therefore cease to identify it as such. Moreover, we may come to accept that our students play with tension simply because we do. Fortunately, there are visual cues that our bodies give which can signal when a player is harboring tension in their playing and what we can do to help ease it. 

· Stiff/locked wrist (both wrists need to be loose and relaxed) 

· Gripping too hard (push light enough on the strings to produce a good sound) 

· Top thumb joint bent and/or pushing excessively hard against the back of the neck (straighten thumb joint and use less pressure to push on behind the neck) 

· Player’s neck bent at extreme angle (keep it straight and chin up) 

· Shoulder(s) hunched up (push them down to relax) 

· Left elbow lifted up and out to an angle (should be pointed down) 

· Right arm pushing unnecessarily hard against the body (don’t push as hard) 

· Fingers hyper-extended (keep them loosely curled in their “natural” state) 

· Poor posture or hunched over playing (keep the back straight) 

· Tighten or stiff jaw muscles (open the mouth and drop the jaw) 

It is extremely important not only to help students recognize tension, but also inform them of what to do in order to relax. Furthermore, we the teacher must keep on top of the student and remind them when we see a reoccurring bad habit which causes tension - for example a student is hunching their left shoulder and have to remind them weekly or even multiple times during a lesson to drop their shoulder. Persistent identification of trouble spots will enable the student to notice the habit themselves, self-correct the trouble spot and eventually remove it from their playing.

Saturday, September 26, 2015

Introducing Major Scales

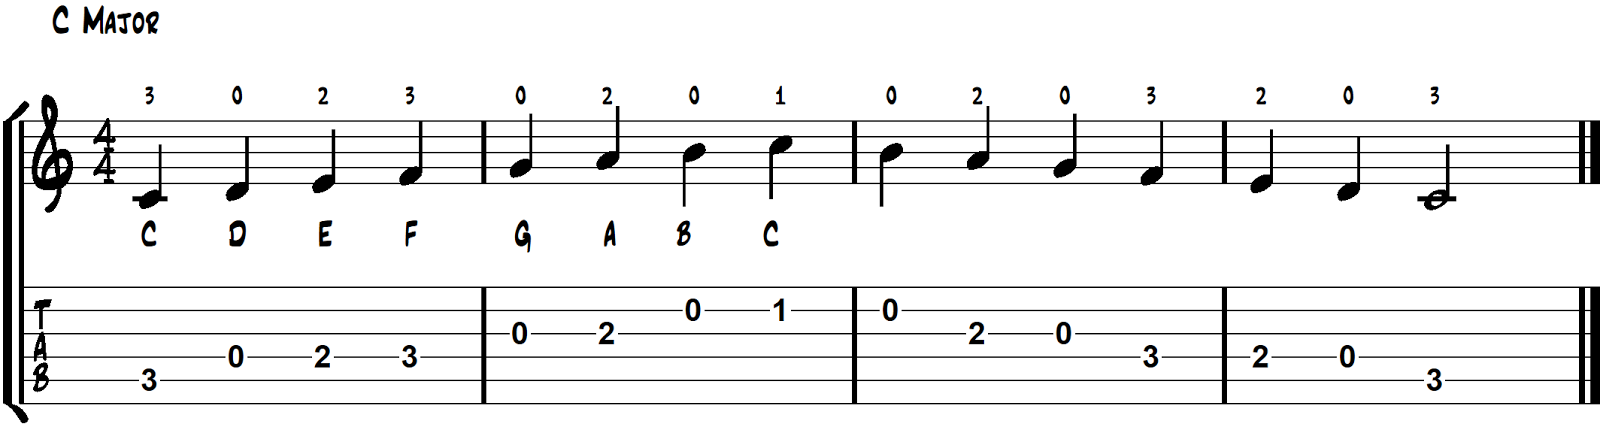
One of things that guitar teachers can take for granted is the importance of major scales. Not only are major scales the gateway to music theory, but they also help develop finger independence. Moreover, major scales are good warm-up exercises as well as essential to developing a player’s ear. 


When introducing major scales to students my preference is to use those in open/first position. This is because if students are sight reading (or at least naming notes) playing scales will help to reinforce learning the notes in this position. 

Above is an example of a C major scale – take note that the information for that scale is dense: 1) The scale is written in both standard notation and tablature. 2) Above the notation are the left hand fingers to use when playing each note. 3) In the middle the notation and tab staves are the names of the notes (ascending only). I like to include as much information as possible so that students can easily reference back to whatever information they need.